部署之前的 Checklist

在进行部署之前需要满足硬件、Linux 操作系统、服务器配置、存储配置和用户环境要求,具体可阅读 Oracle 19C 的安装手册:https://docs.oracle.com/en/database/oracle/oracle-database/19/ladbi/oracle-database-installation-checklist.html

Linux 的准备工作

关闭主机防火墙(非必须,也可以设置防火墙策略放行所需开放的端口):

1
sudo systemctl disable --now firewalld

禁用 SELinux,避免因为不满足策略导致被阻止:

1
2
3
4
5
sudo setenforce 0

grep SELINUX= /etc/selinux/config
# SELINUX= can take one of these three values:
SELINUX=disabled

修改 /etc/hosts 添加名称解析:

1
2
3
4
[student@oel7 ~]$ cat /etc/hosts
127.0.0.1 localhost localhost.localdomain localhost4 localhost4.localdomain4
::1 localhost localhost.localdomain localhost6 localhost6.localdomain6
192.168.131.141 oel7 oel7.example.com

/dev/shm

/dev/shm 目录比较特殊,往目录中写入的文件会存放于 RAM 中,相当于 ramdisk 。
/dev/shm 的大小默认为内存的一半:

1
2
3
4
5
6
7
[student@oel7 ~]$ free -m
total used free shared buff/cache available
Mem: 3926 827 347 43 2752 2779
Swap: 4095 0 4095
[student@oel7 ~]$ df -h /dev/shm
Filesystem Size Used Avail Use% Mounted on
tmpfs 2.0G 0 2.0G 0% /dev/shm

大小为 2G 但并不是真实占用 2G 内存,只是最大上限能使用 2G 内存。

Oracle 有一个自动内存管理(Automatic Memory Management)特性,需要更多的共享内存,如果启用的话,共享内存大小必须大于 MEMORY_MAX_TARGET 和 MEMORY_TARGET 的初始化参数值。

增加 /dev/shm 大小:

1
2
3
4
5
6
[student@oel7 ~]$ tail -1 /etc/fstab
shm /dev/shm tmpfs size=3G 0 0
[student@oel7 ~]$ sudo mount -o remount /dev/shm
[student@oel7 ~]$ df -h /dev/shm
Filesystem Size Used Avail Use% Mounted on
tmpfs 3.0G 0 3.0G 0% /dev/shm

依赖包

不同的 OS 所需的依赖包有所不同,具体可参考 Oracle 官方文档:https://docs.oracle.com/en/database/oracle/oracle-database/19/ladbi/supported-oracle-linux-7-distributions-for-x86-64.html

在 OEL7 中,需要以下依赖包:

1
2
3
4
5
6
7
8
9
10
11
12
13
14
15
16
17
18
19
20
21
22
23
24
25
26
27
bc
binutils
compat-libcap1
compat-libstdc++-33
elfutils-libelf
elfutils-libelf-devel
fontconfig-devel
glibc
glibc-devel
ksh
libaio
libaio-devel
libXrender
libXrender-devel
libX11
libXau
libXi
libXtst
libgcc
libstdc++
libstdc++-devel
libxcb
make
policycoreutils
policycoreutils-python
smartmontools
sysstat

但是只需安装 oracle-database-preinstall-19c 会自动处理以上依赖包:

1
2
3
4
5
6
7
8
9
10
11
12
13
14
15
[student@oel7 ~]$ yum info oracle-database-preinstall-19c
Loaded plugins: langpacks, ulninfo
Available Packages
Name : oracle-database-preinstall-19c
Arch : x86_64
Version : 1.0
Release : 3.el7
Size : 27 k
Repo : ol7_latest/x86_64
Summary : Oracle Database Preinstallation RPM
License : GPLv2
Description : The Oracle Database Preinstallation RPM automatically installs any additional
: packages needed for installing Oracle Grid Infrastructure and Oracle Database
: and configures your server operating system automatically, including setting
: kernel parameters and other basic operating system requirements for install.

使用 yum install 进行安装:

1
[student@oel7 ~]$ sudo yum install -y oracle-database-preinstall-19c

同时,该软件会自动配置好用户和组:

1
2
[student@oel7 ~]$ id oracle
uid=54321(oracle) gid=54321(oinstall) groups=54321(oinstall),54322(dba),54323(oper),54324(backupdba),54325(dgdba),54326(kmdba),54330(racdba)

设置好内核参数:

1
2
3
4
5
6
7
8
9
10
11
12
13
14
15
16
17
18
19
20
21
22
23
24
25
26
27
28
29
30
31
32
33
34
35
36
37
38
39
40
41
42
43
44
45
46
47
48
49
50
51
52
53
[student@oel7 ~]$ cat /etc/sysctl.d/99-oracle-database-preinstall-19c-sysctl.conf
# sysctl settings are defined through files in
# /usr/lib/sysctl.d/, /run/sysctl.d/, and /etc/sysctl.d/.
#
# Vendors settings live in /usr/lib/sysctl.d/.
# To override a whole file, create a new file with the same in
# /etc/sysctl.d/ and put new settings there. To override
# only specific settings, add a file with a lexically later
# name in /etc/sysctl.d/ and put new settings there.
#
# For more information, see sysctl.conf(5) and sysctl.d(5).

# oracle-database-preinstall-19c setting for fs.file-max is 6815744
fs.file-max = 6815744

# oracle-database-preinstall-19c setting for kernel.sem is '250 32000 100 128'
kernel.sem = 250 32000 100 128

# oracle-database-preinstall-19c setting for kernel.shmmni is 4096
kernel.shmmni = 4096

# oracle-database-preinstall-19c setting for kernel.shmall is 1073741824 on x86_64
kernel.shmall = 1073741824

# oracle-database-preinstall-19c setting for kernel.shmmax is 4398046511104 on x86_64
kernel.shmmax = 4398046511104

# oracle-database-preinstall-19c setting for kernel.panic_on_oops is 1 per Orabug 19212317
kernel.panic_on_oops = 1

# oracle-database-preinstall-19c setting for net.core.rmem_default is 262144
net.core.rmem_default = 262144

# oracle-database-preinstall-19c setting for net.core.rmem_max is 4194304
net.core.rmem_max = 4194304

# oracle-database-preinstall-19c setting for net.core.wmem_default is 262144
net.core.wmem_default = 262144

# oracle-database-preinstall-19c setting for net.core.wmem_max is 1048576
net.core.wmem_max = 1048576

# oracle-database-preinstall-19c setting for net.ipv4.conf.all.rp_filter is 2
net.ipv4.conf.all.rp_filter = 2

# oracle-database-preinstall-19c setting for net.ipv4.conf.default.rp_filter is 2
net.ipv4.conf.default.rp_filter = 2

# oracle-database-preinstall-19c setting for fs.aio-max-nr is 1048576
fs.aio-max-nr = 1048576

# oracle-database-preinstall-19c setting for net.ipv4.ip_local_port_range is 9000 65500
net.ipv4.ip_local_port_range = 9000 65500

设置安装目录

为数据库软件安装位置创建目录并设置权限:

1
2
3
sudo mkdir -p /u01/app/oracle/product/19.3.0/db_1
sudo chown -R oracle:oinstall /u01
sudo chown 775 /u01 -R

设置 oracle 用户

为 oracle 用户设置密码,方便后续的使用:

1
2
3
[student@oel7 ~]$ echo oracle | sudo passwd --stdin oracle
Changing password for user oracle.
passwd: all authentication tokens updated successfully.

还需为 oracle 用户设置环境变量用于后续连接数据库:

1
2
3
4
5
6
7
8
9
10
11
12
13
14
15
16
17
18
19
20
21
22
23
24
[student@oel7 ~]$ su - oracle
Password:
Last login: Fri Jan 3 17:29:40 CST 2025 on pts/1
[oracle@oel7 ~]$ cat .bash_profile
# .bash_profile

# Get the aliases and functions
if [ -f ~/.bashrc ]; then
. ~/.bashrc
fi

# User specific environment and startup programs

PATH=$PATH:$HOME/.local/bin:$HOME/bin

export PATH
export ORACLE_SID=orcl
export ORACLE_BASE=/u01/app/oracle
export ORACLE_HOME=$ORACLE_BASE/product/19.3.0/db_1
export PATH=$PATH:$ORACLE_HOME/bin
export LD_LIBRARY_PATH=$LD_LIBRARY_PATH:$ORACLE_HOME/lib
export CLASSPATH=$ORACLE_HOME/JRE:ORACLE_HOME/jlib:$ORACLE_HOME/rdbms/jlib

[oracle@oel7 ~]$ source .bash_profile

安装 Oracle Database

Oracle 提供了 rpm 包和 Zip 包两种安装方式,对应的下载地址为:https://www.oracle.com/database/technologies/oracle-database-software-downloads.html

上传和解压安装包

使用 Zip 包进行安装,首先需要将文件上传到 ORACLE_HOME 目录中,然后使用 oracle 用户进行解压:

1
2
3
4
5
[oracle@oel7 db_1]$ pwd
/u01/app/oracle/product/19.3.0/db_1
[oracle@oel7 db_1]$ ls
LINUX.X64_193000_db_home.zip
[oracle@oel7 db_1]$ unzip LINUX.X64_193000_db_home.zip

通过图形化安装

使用 oracle 用户前往 $ORACLE_HOME 目录,在此目录下运行解压出来的 runInstaller 安装程序:

1
2
3
4
[oracle@oel7 ~]$ cd $ORACLE_HOME
[oracle@oel7 db_1]$ pwd
/u01/app/oracle/product/19.3.0/db_1
[oracle@oel7 db_1]$ ./runInstaller

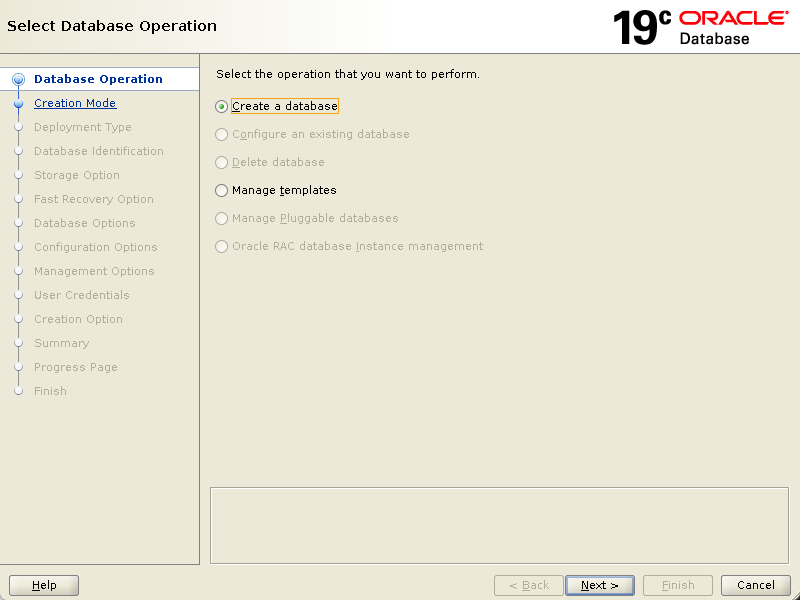
图形化安装步骤:

创建监听

使用 oracle 用户运行 netca 命令打开图形化配置监听:

使用默认的值创建一个名为 LISTENER 监听 TCP 1521 ,检查创建情况:

1
2
3
4
5
6
7
8
9
10
11
12
13
14
15
16
17
18
19
20
21
22
23
[oracle@oel7 ~]$ lsnrctl status

LSNRCTL for Linux: Version 19.0.0.0.0 - Production on 03-JAN-2025 18:39:33

Copyright (c) 1991, 2019, Oracle. All rights reserved.

Connecting to (DESCRIPTION=(ADDRESS=(PROTOCOL=TCP)(HOST=oel7)(PORT=1521)))
STATUS of the LISTENER
------------------------
Alias LISTENER
Version TNSLSNR for Linux: Version 19.0.0.0.0 - Production
Start Date 03-JAN-2025 18:38:53
Uptime 0 days 0 hr. 0 min. 39 sec
Trace Level off
Security ON: Local OS Authentication
SNMP OFF
Listener Parameter File /u01/app/oracle/product/19.3.0/db_1/network/admin/listener.ora
Listener Log File /u01/app/oracle/diag/tnslsnr/oel7/listener/alert/log.xml
Listening Endpoints Summary...
(DESCRIPTION=(ADDRESS=(PROTOCOL=tcp)(HOST=oel7)(PORT=1521)))
(DESCRIPTION=(ADDRESS=(PROTOCOL=ipc)(KEY=EXTPROC1521)))
The listener supports no services
The command completed successfully

创建数据库

使用 dbca 图形化方式创建数据库。
创建数据库步骤:

命令行安装

dbca 除了通过图形化方式创建数据库外还支持通过命令行方式创建数据库。

创建非容器数据库:

1
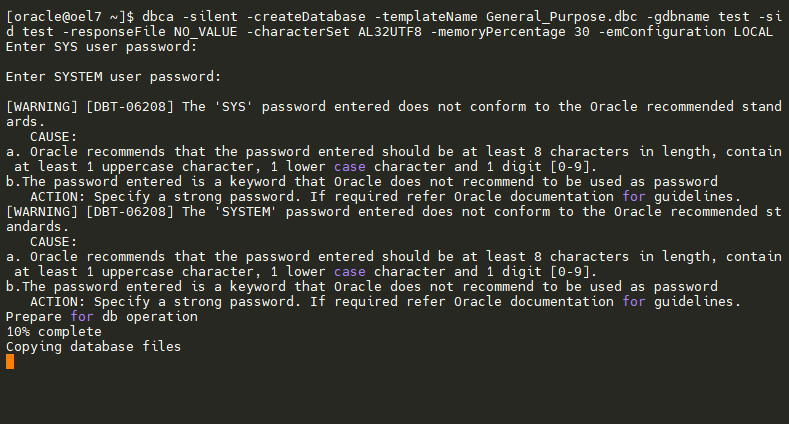
dbca -silent -createDatabase -templateName General_Purpose.dbc -gdbname test -sid test -responseFile NO_VALUE -characterSet AL32UTF8 -memoryPercentage 30 -emConfiguration LOCAL

执行之后的输出:

创建容器数据库:

1
dbca -silent -createDatabase -createAsContainerDatabase true -templateName General_Purpose.dbc -gdbname mydb -sid mydb -responseFile NO_VALUE -characterSet AL32UTF8 -memoryPercentage 30 -emConfiguration LOCAL

命令中使用的参数:
-silent:静默方式安装
--createDatabase:创建数据库
--createAsContainerDatabase:是否创建容器数据库
--templateName:模板名称
--gdbname:指定创建的全局数据库名称
-sid:指定数据库系统标识符
-reposonseFile:指定响应文件
-characterSet:指定数据库使用的字符集
-memoryPercentage:指定用于数据库的物理内存百分比
-emConfiguration:指定 Enterprise Manager 的管理选择

测试部署的数据库:

1
2
3
4
5
6
7
8
9
10
11
12
13
14
15
16
17
18
19
20
21
22
23
24
25
[oracle@oel7 ~]$ sqlplus / as sysdba

SQL*Plus: Release 19.0.0.0.0 - Production on Fri Jan 3 22:01:58 2025
Version 19.3.0.0.0

Copyright (c) 1982, 2019, Oracle. All rights reserved.

Connected to:
Oracle Database 19c Enterprise Edition Release 19.0.0.0.0 - Production
Version 19.3.0.0.0

SQL> show pdbs;

CON_ID CON_NAME OPEN MODE RESTRICTED
---------- ------------------------------ ---------- ----------
2 PDB$SEED READ ONLY NO
3 PDB1 READ WRITE NO
4 PDB2 READ WRITE NO
SQL> conn sys/oracle@oel7:1521/pdb1 as sysdba
Connected.
SQL> show pdbs;

CON_ID CON_NAME OPEN MODE RESTRICTED
---------- ------------------------------ ---------- ----------
3 PDB1 READ WRITE NO

切换实例

查找实例:

1
2
3
4
[oracle@oel7 ~]$ ps -ef | grep pmon
oracle 2722 1 0 20:54 ? 00:00:00 ora_pmon_orcl
oracle 6238 1 0 21:11 ? 00:00:00 ora_pmon_test
oracle 10247 1 0 21:32 ? 00:00:00 ora_pmon_mydb

使用 . oraenv 切换 SID,然后连接数据库进行验证:

1
2
3
4
5
6
7
8
9
10
11
12
13
14
15
16
17
18
19
20
21
22
23
24
25
26
27
28
29
30
31
32
33
[oracle@oel7 ~]$ . oraenv
ORACLE_SID = [test] ? mydb
The Oracle base remains unchanged with value /u01/app/oracle
[oracle@oel7 ~]$ sqlplus / as sysdba

SQL*Plus: Release 19.0.0.0.0 - Production on Fri Jan 3 21:40:08 2025
Version 19.3.0.0.0

Copyright (c) 1982, 2019, Oracle. All rights reserved.

Connected to:
Oracle Database 19c Enterprise Edition Release 19.0.0.0.0 - Production
Version 19.3.0.0.0

SQL> show parameters name;

NAME TYPE VALUE
------------------------------------ ----------- ------------------------------
cdb_cluster_name string
cell_offloadgroup_name string
db_file_name_convert string
db_name string mydb
db_unique_name string mydb
global_names boolean FALSE
instance_name string mydb
lock_name_space string
log_file_name_convert string
pdb_file_name_convert string
processor_group_name string

NAME TYPE VALUE
------------------------------------ ----------- ------------------------------
service_names string mydb

除此之外还可以通过设置环境变量的方式来切换:

1
export ORACLE_SID=mydb

增强体验的工具和设置

可以为系统配置 rlwrap 工具和提示符。

rlwrap 安装配置

rlwrap 可方便在 sqlpuls 中使用上下左右键。
在 RHEL7 中,rlwrap 不在 YUM 仓库中也不在 EPEL 仓库中,可以通过源代码编译进行安装。

解压:

1
[root@oel7 ~]# tar xf rlwrap-0.37.tar.gz

安装所需的依赖和编译所需的包:

1
[root@oel7 ~]# yum install -y gcc gcc-c++ libtermcap-devel readline readline-devel

配置、编译和安装:

1
[root@oel7 rlwrap-0.37]# ./configure  && make && make install

安装后位于 /usr/local/bin/rlwrap

随后在环境变量中添加别名进行使用:

1
2
3
[oracle@oel7 ~]$ tail -1 .bash_profile
alias sqlplus='/usr/local/bin/rlwrap sqlplus'
[oracle@oel7 ~]$ source .bash_profile

提示符配置

sqlplus 的提示符可以编辑 $ORACLE_HOME/sqlplus/admin/glogin.sh ,设置为以下内容:

1
2
3
4
set termout off
column propmt_c new_value propmt_c
SELECT SYS_CONTEXT ('USERENV', 'CON_NAME') as propmt_c FROM DUAL;
set sqlprompt "_user'@'_connect_identifier(&propmt_c)> "

使用 sqlplus 连接数据库后就有提示符:

1
2
3
4
SYS@orcl(CDB$ROOT)>
@(CDB$ROOT)> conn sys/oracle@oel7:1521/pdb1 as sysdba
Connected.
SYS@oel7:1521/pdb1(PDB1)>